


How to Plan a Website Update (and Finally Cross It Off Your To-Do List)

This blog is dedicated to helping you make sense of all those fluffy marketing terms you hear on Instagram and figure out what they actually mean for your business. Step-by-step guides, platform breakdowns, client case studies, and deep dives into the stuff that actually helps you grow.
XO Catie
You know your website needs an update.
Maybe your business has changed and your site hasn’t caught up. Maybe people keep asking questions you thought your website answered. Or maybe you have a new offer ready to go and nowhere to send people.
So you add “update website” to your to-do list. And there it stays.
The problem? “Update website” could mean rewriting one page, reorganizing your navigation, or rebuilding the whole thing.
Here’s how to plan a website update: decide what this version needs to do, break the work into manageable pieces, and give those pieces real time on your calendar.
Before you start, you need to know what kind of project you have. Updating a few pages, building a temporary one-page site, and starting from scratch are three very different things.
And if you do end up in the template shop, that’s okay! Scrolling templates is the fun part. But a template can’t tell you which pages you need or how someone should move through your site. Those decisions are yours to make.
A website project isn’t one task. It’s a series of decisions—and all those little decisions can get overwhelming fast.
A workable website update plan answers six questions:
- What needs to change—and what can stay?
- What will you do yourself, and where do you want help?
- Which pages do you need?
- What content needs to be ready?
- What order should the work happen in?
- When will you actually do it?
The copy, the design, the email forms, the tech that connects everything… if you don’t know how the pieces fit together, it’s hard to know what to do first. And when you start in the wrong place, you can end up doing the same work twice.
But when you understand the process, the project starts to feel different. You can see the path, make a list, put things in an order that makes sense, and decide where you want to get help. Less guessing. Less unnecessary work. And a lot more room to actually feel excited about what you’re creating.
I learned that one the hard way. When I rebuilt my own site, I tried to solve my positioning, four sales pages, my homepage, my services page, and the design all at the same time. (I wrote about that whole saga—and how I’d do it in phases next time—in Your website was never supposed to be a one-and-done thing.)
I’ve worked on dozens of websites over the years, and many of them already existed in some capacity. One thing I’ve really seen this year? Not everyone needs—or is ready for—a $5,000 overhaul. Especially if you’re in the middle of a pivot, rebuilding everything before you know what needs to change can create more work for you later.
That’s where Studio Sessions and Studio Days come in. We look at where your website needs to catch up to your brand, figure out what matters most right now, and then use a Studio Day to work through those priorities. The goal is to help you move forward instead of staying stuck in that messy middle.
This post walks you through the same planning process so you can do it yourself, too. You’ll figure out how big the project actually is, what order to tackle it in, and which pieces might be worth getting help with. You can use the plan to focus a CCO Week—or bring it into a Studio Day if you’d rather have a hand.
Whether your website needs a few focused updates or a bigger rebuild, here’s how I’d plan the work—and decide which parts to handle myself or bring in help for.
1. Define what your website update needs to accomplish
“Update my website” is too big to cross off and too vague to tell you where to start.
What does updating it actually mean?
Maybe your offer changed and your services page doesn’t reflect it anymore. Maybe your photos aren’t that great or don’t look like you anymore. Maybe you really do need a new site—but that doesn’t mean every single page has to be part of the same deadline.
Start with a walkthrough of what you already have
When I plan website updates with clients, I don’t start by making a list of everything we could redesign. I start by looking at the business now and the website as it exists today. What has changed? What still works? Where is the gap?
Open your site on your phone and your computer. Pretend you’re someone who just found your business and wants to take the next step. As you click through, write down what you notice in three lists:
- Keep: What’s accurate, useful, easy to find, or still feels like your brand?
- Update: What’s outdated, confusing, missing, hard to use, or no longer looks and sounds like you?
- Decide: What can’t be updated until you make another decision—like finalizing an offer, choosing your colors, or deciding how people will book?
Look at your offers and pricing, page copy, navigation, photos, colors and fonts, buttons, forms, and mobile layout. If you have analytics or customer feedback, use them to add context: which pages are people visiting, and what questions do they still ask? You don’t need a perfect data report to begin. Just don’t assume a visual change will fix a confusing offer or a broken form.
For each issue, write the page, what you noticed, and why it matters. “My services page feels off” is a starting point. “My services page describes an offer I no longer sell, so visitors can’t see how to work with me now” gives you something to plan around.
Here’s what that starting point has looked like in a few of my client projects:
- Painted Horse: Visitors were having trouble finding event information and gift cards. The project needed to make it easier for people to find their way around and take the next step.
- Alana: She already had a basic Shopify site and products to sell, but needed a clearer way to introduce her brand and help people understand her different product lines.
- Kath: Her business was shifting, and she needed a clear online home for her current offer while she continued figuring out what came next. A one-page site made more sense than waiting to build everything at once.
Three different starting points. Three different projects. None of them could have been solved by putting “update website” on a to-do list and hoping for the best.
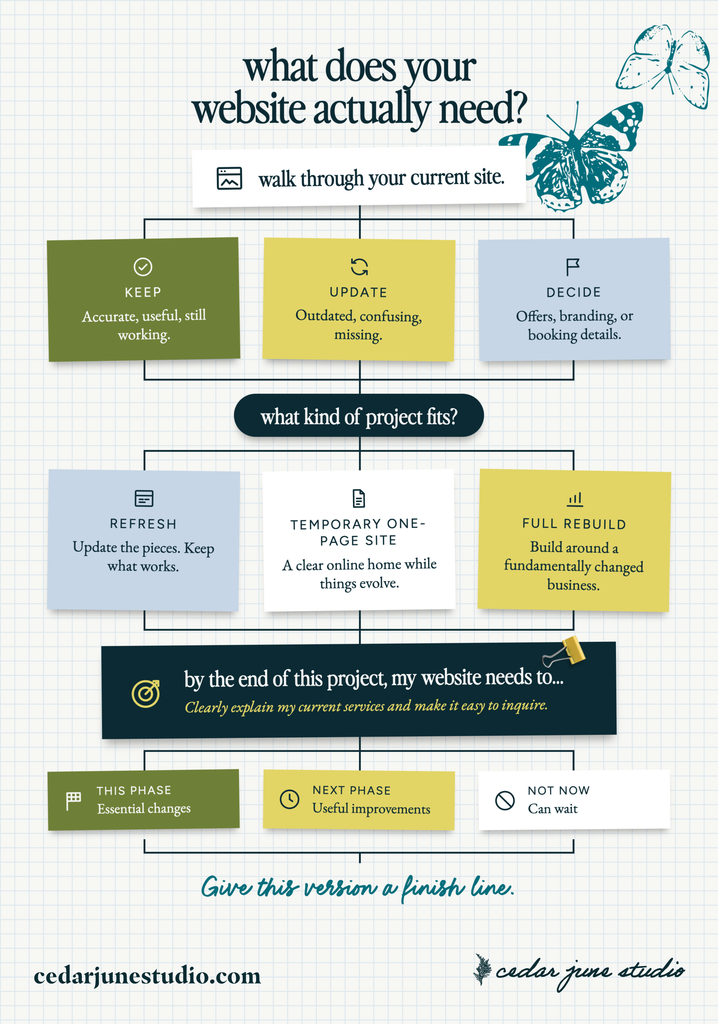
Your website is going to fall into one of three kinds of projects
- A refresh. Your website is still doing some of what you need it to do, but parts of it haven’t kept up with your business. Maybe your offers need clearer copy, your photos no longer feel like you, or you’ve updated your brand colors and fonts but haven’t brought them onto your site yet. Or maybe you’ve never had a cohesive visual identity, and your website is starting to feel like a collection of decisions you made along the way. A refresh lets you update the pieces that need attention while keeping what’s already working.
- A temporary one-page site. You’re in the middle of a rebrand or a big pivot, and your offers aren’t ironed out yet. Instead of taking your site offline while you figure it out (trust me—I did that, and it cost me organic traffic), put up a simple one-page site that covers who you are, what you offer right now, and where to go next. That’s what we did for my client Kath during her brand pivot. It gives her a clear online home, and we’ll add to it once her offers are dialed in.
- A full rebuild. Your audience, core promise, offers, or the path to work with you have fundamentally changed, and your current site tells the wrong story. A rebuild makes sense here—but even then, keep a useful page live while you build.
Not sure which one you’re in? My guide to website refresh vs. rebuild walks through the questions to ask before deciding how much to change.
Once you know which bucket you’re in, finish this sentence:
By the end of this project, my website needs to ______.
Get specific. For example:
- Clearly explain my current services and make it easy to inquire.
- Give my new offer its own sales page.
- Replace the outdated copy and photos on my core pages.
- Give my business a clear online home while I figure out the rest.
Then separate what has to happen now from what can come later.
Start with the changes that make the site accurate, unblock the visitor’s next step, support a current offer or deadline, or have to happen before other work. Outdated pricing or a broken inquiry form probably comes before finding the perfect decorative font.
Give yourself three lists: this phase, next phase, and not now. Pick only as much for this phase as your time and budget can actually hold. You can always move the next item up once this version is working.
You’re not making a list of everything your website could someday do. You’re deciding what this version needs to do.
What you should have when you’re done: One sentence describing the goal, a short list of priority updates, and a separate list of what can wait. That’s a project with a finish line.
2. Decide what to DIY and where to get help with your website updates
“Am I going to DIY this or hire a designer?” is a good place to start. But it isn’t the whole decision.
A website is actually a bunch of different jobs:
- Brand positioning and offer decisions
- Copywriting
- Photos (and video, if you’re feeling fancy)
- Design
- Tech setup—domains, forms, booking, email integrations
- SEO
- Testing and launch
You might feel totally confident doing some of those and want nothing to do with the others. That’s normal.
You could buy a template and pay the template designer to customize it. Write your own copy from a copy template, then get feedback on it. Hire a copywriter before the design starts. Or work with a web designer who walks you through the content side, too.
You don’t have to choose between doing absolutely everything yourself and handing absolutely everything over. But you do need to know who’s responsible for each piece—otherwise that piece just… doesn’t happen.
If you’re hiring someone, ask what’s actually included. Don’t assume “website design” automatically means copywriting, keyword research, sourcing photos, or connecting every third-party platform you use.
And if you’re DIYing, get honest about what you actually want to learn—and what you’d rather pay someone else to handle. That’s a planning decision, not a personal failing.
Decide what you can invest in this phase, too—including your platform, a template, and any copywriting, design, or tech support. If the budget doesn’t cover everything, narrow the project before trying to squeeze everything in.
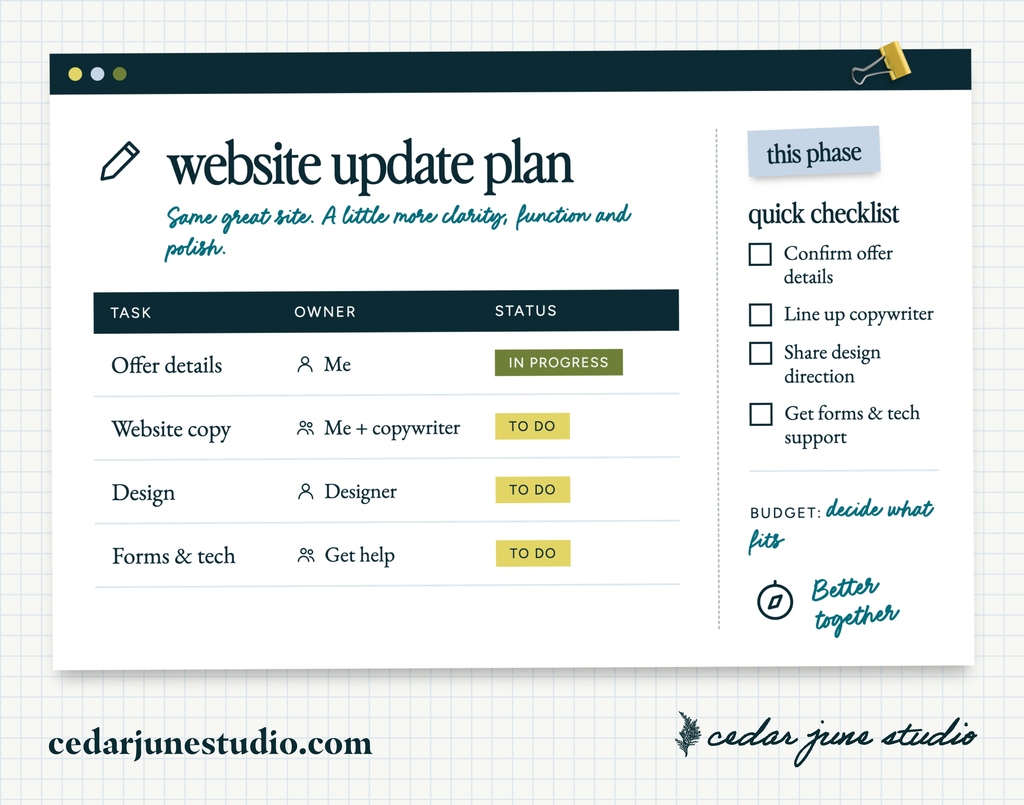
Now go back to your priority list and put a name next to each job: me, someone I hire, or still need to decide. Add what that person needs before they can start and when you’ll need it. For example:
- Offer details: I’ll confirm what’s included and how people book.
- Copy: I’ll draft the page; a copywriter will review it.
- Design and tech: My designer will update the page and connect the inquiry form after I’ve approved the copy and provided access.
That’s not the only way to divide the work. The point is to make the handoffs visible. If connecting your email form makes you want to throw your laptop across the room, that might be the piece you get help with—not a reason to hand off every part of the project.
What you should have when you’re done: An owner for each priority, the support you need to find, and a budget for this phase.
3. Plan your website pages before choosing a template
Start with the pages you already have—not a list of all the pages a template happens to include. Make a simple inventory of your current pages and decide which ones to keep, update, add, or retire.
What are you selling? What does someone need to understand before they’re ready to inquire or buy? Where should they go next?
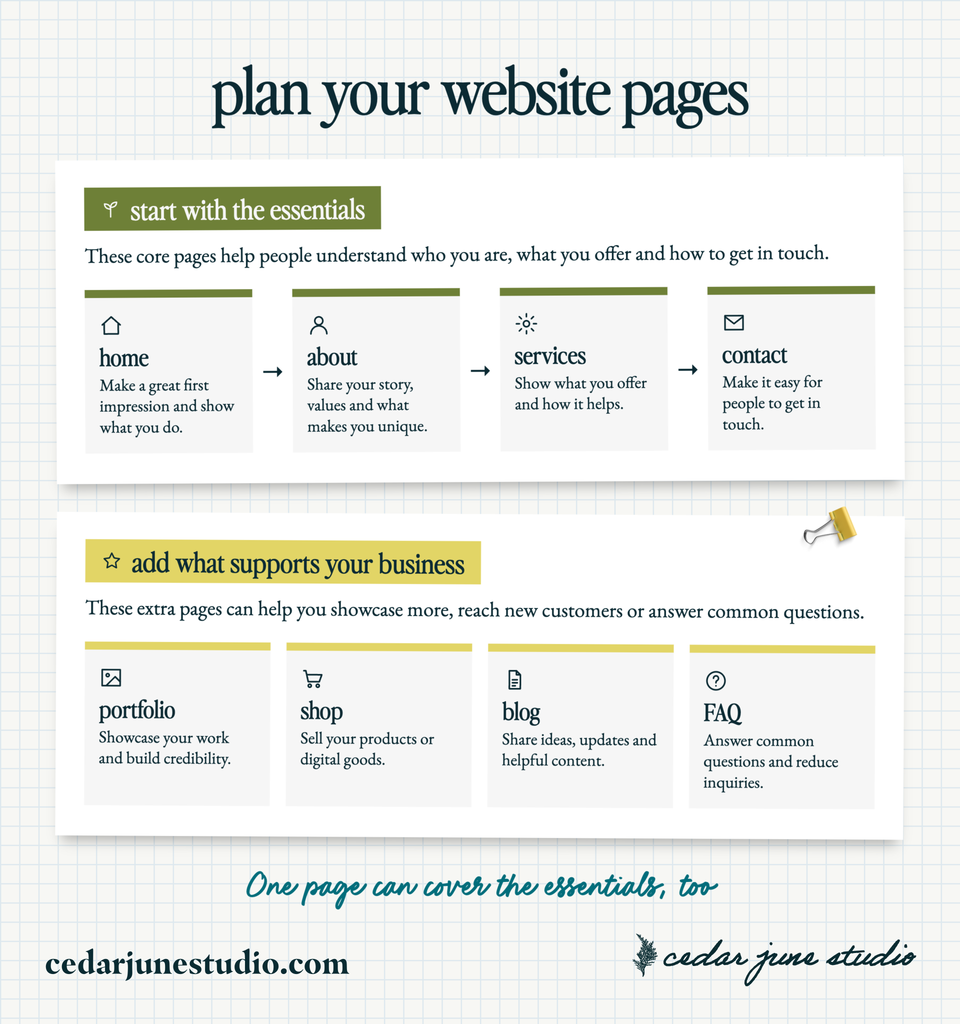
Start with the essentials
At the bare minimum, someone visiting your website needs to be able to understand:
- Who you are: Introduce yourself or your business and give people a reason to trust you. This might be an About page or a section on a one-page site.
- What you offer: Explain who you help, what you offer, and enough about how it works for someone to know whether it’s right for them.
- How to take the next step: Make it easy to contact you, inquire, book, or buy—whatever makes sense for your business. Check that the button or form actually works.
- How to find their way around: Give visitors clear navigation or links between those essentials, so they don’t have to dig to find the information they came for.
On a full site, those essentials might live on a homepage, an About page, an offer or services page, and a contact page. A one-page site can cover them in clear sections instead.
Also make a separate note for any privacy policy, terms, or other legal information your business needs. Requirements depend on your business, location, and how you collect information, so get appropriate legal guidance if you’re unsure.
Decide which extras actually support your business
Now look at what you sell and how people find and work with you. What do they need to see or understand before they’re ready to take the next step? That answer—not a template’s page count—tells you what else to add.
Depending on your business, that might be:
- Individual service or sales pages: Give an offer its own space when people need more detail before they inquire or buy.
- A portfolio or case studies: Show examples of your work and help people picture what working with you could look like.
- A shop or product pages: Let people browse and purchase products, with clear details about what they’re buying.
- A blog or resources page: Share useful information, answer questions, and give people another way to discover your work.
- An FAQ: Answer recurring questions about your offers, process, pricing, or logistics. It can be a separate page or a section on an offer page.
- An email opt-in or free resource: Give people who aren’t ready to buy a useful next step and a way to stay connected.
- Booking, events, or other specialty pages: Help people reserve a service, find an event, or access an experience your business actually offers.
Turn your page list into a plan
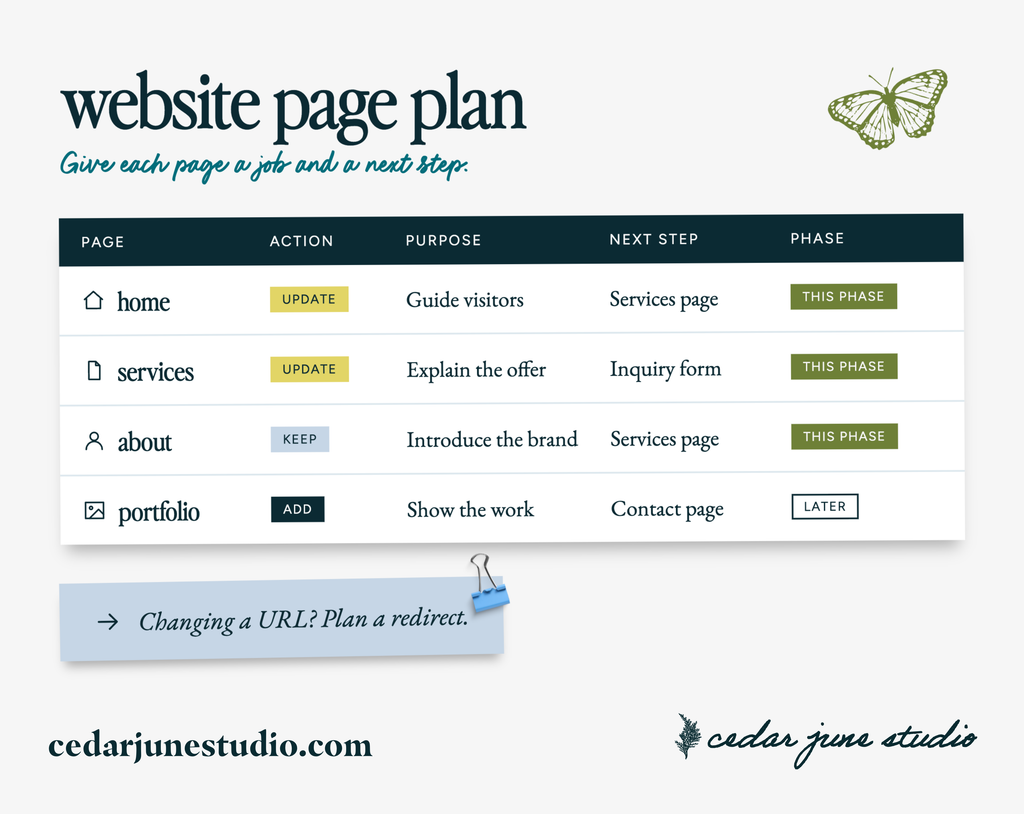
Grab a document or spreadsheet and list the pages you already have, plus any you think you need. For each one, jot down:
- Keep, update, add, or retire? Include the current URL if the page already exists.
- What’s its job? Write what the visitor needs to understand and what you want them to do next.
- What needs to happen? Note the specific changes or content needed, and whether they’ll happen in this phase or later.
For example: Services page → update → explain who my current service is for and what’s included → link to the inquiry form → rewrite offer details and test the form this phase.
Then follow the path yourself: Can someone find that services page from your homepage or menu? Does the button take them to the right form? Your homepage might just need a clearer link—not a complete redesign.
For an optional page you’re thinking about adding, ask whether it has a job that supports this phase and whether you can keep it current. If not, put it on your later list. You can always add it when it makes sense for your business.
Before you remove a page or change its URL
A quick heads-up before you start cleaning house: your page’s URL is its web address—the link someone clicks to get there. If you change that address or remove the page, an old link from Google, Pinterest, or someone else’s website could lead to a “page not found” message instead.
A redirect sends someone from the old address to a relevant page at a new address. Think of it like leaving a forwarding address when you move. A 301 redirect tells browsers and search engines that the move is permanent.
For example, if you change yourwebsite.com/work-with-me to yourwebsite.com/services, a redirect can send people who use the old link to your new services page instead.
Here’s where to start:
- List the pages you’re changing or removing. Save their current URLs before you make changes. If you’re keeping a page at the same URL, you generally don’t need a redirect just because you’re updating its design.
- Find a relevant destination. For each old URL, note the new page that best matches what a visitor was looking for. If there isn’t a good match, pause and decide whether the page should stay or be removed—don’t automatically send every old link to your homepage.
- Check what’s already working. If you have Google Search Console set up, its instructions for finding your most popular pages can help you see which pages get clicks from Google Search. Make a note of any pages you know are linked from elsewhere, too. No Search Console? Start with the links you know about; you don’t have to solve everything today.
- Set up and test your redirects. The steps depend on your platform: follow the Squarespace URL mappings guide or the Showit redirects guide. Once the change is live, open each old URL and check that it takes you to the right page.
You don’t have to become an SEO expert to update your website. Just give your existing links a little attention before they disappear—and get help with the redirects if the tech isn’t your thing.
What you should have when you’re done: A page-by-page list with a purpose, next step, and keep/update/add/retire decision for each priority page.
4. Gather your website content and plan before designing
This is where website projects get sticky.
Maybe you’re updating your existing site, or maybe you picked a template, changed the colors, and spent a whole afternoon moving sections around.
Then you get to the services section and realize you don’t actually know what to put there.
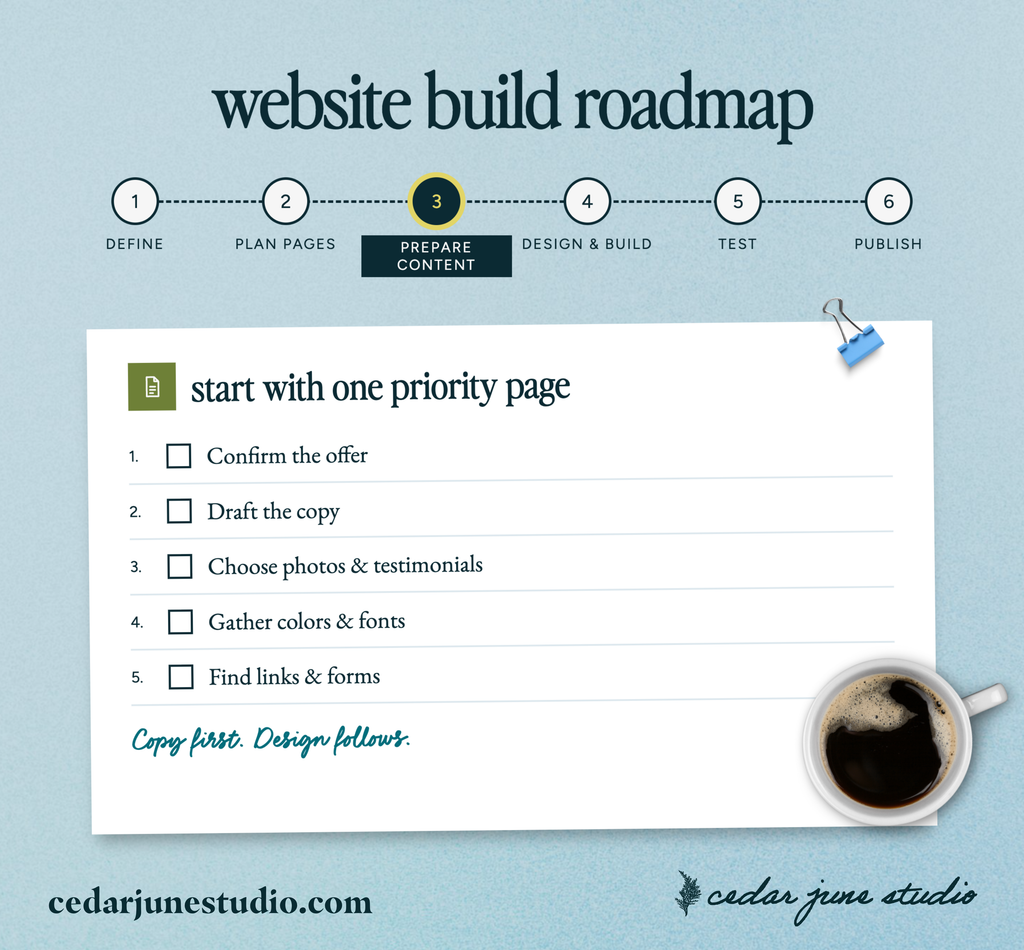
Before you update your website, get the pieces for your priority pages ready. You don’t need to do everything at once—here’s the order I’d start in:
- Get clear on your offers. Confirm what you’re selling, who it’s for, what’s included, your pricing, and how someone can book or buy. These decisions make the rest of the page much easier to write.
- Write your website copy. Start with the information someone needs on each priority page and the next step you want them to take. Use what you already have where it still fits.
- Gather your supporting content. Choose the photos, testimonials, and portfolio examples that help tell the story of that offer. You don’t need to go hunting for everything at once—start with what you have.
- Pull together your visual branding. Gather your colors, fonts, and any other brand assets you’ll use. If they need a refresh, decide what needs to be updated before you start designing. A simple working palette and font choices can be enough for this phase.
- Find the links and tools that make it work. Gather your contact, booking, or checkout links and any forms or email opt-ins you want to connect. Make sure you can access your website builder and the relevant tools, too.
Start with one priority page from the list you made in step three. For a services page, that might mean confirming your offer details first, then drafting the copy, choosing a photo and testimonial, and finding the inquiry form link. Once you know what’s ready and what’s missing, you have a starting point—not a giant pile of things to figure out all at once.
The copy should shape the design—not get squeezed into whatever space is left over.
I also recommend writing your offer pages before you polish your homepage. Get clear on each thing you’re selling first, then use the homepage to help people find their way to it. Homepage last. Always.
This is also the time to think about SEO—what each page should be found for—before you start choosing heading styles because they look nice. (I went deep on why headings aren’t just font choices in “If You Build It, They Will Come (Is a Lie)”.)
And if you’re writing your own copy, please work from a website copy template. It’s so much easier to answer good prompts than to stare at a blank text box labeled “Tell your story.”
5. Put your website updates in a workable order
Not every part of a website project can happen at the same time—no matter how badly you want it to.
Your designer may need your copy before they can start. Your photos depend on which offers you’re featuring. Your homepage is easier to write once your services pages are clear.
Those are dependencies. Figuring them out early keeps you from setting a launch date that assumes everything will magically happen at once.
A working order might look like:
Define the project → plan the pages → gather the content → build → test → publish.
Then make each step small enough to actually finish.
“Build website” turns into:
- Write the services page.
- Choose the photos for it.
- Add and format the copy.
- Connect the inquiry button.
- Check it on mobile.
- Test every link.
Each page becomes its own mini project, with a real finish line. That’s how you avoid my four-sales-pages-at-once situation.
Turn your priorities into a working plan
Look at your priority list and ask: What needs to be finished before the next thing can happen?
Put your tasks in order and note who’s responsible for each one. If you’re waiting on someone else, include that handoff in your plan. Leave room for feedback, revisions, and testing—not just the first draft of the design.
Before you cross a page off your list, check it on desktop and mobile, test its links and forms, and fix anything that isn’t working. Then think about how you’ll share the update, whether that’s in an email, a social post, or somewhere else your audience already finds you.
Now you have a plan to put on your calendar—not just a list of things you hope to get done.
6. Make time to finish your website update
Your website is not going to get finished in the leftover time after everything else. I know, because I tried that for a long time.
The #1 thing I have to thank for finally finishing my own website? A CCO Week—Chief Creative Officer Week.
It’s a 7–14 day stretch where you get to be your own client. You give your brand the same focused attention you’d give a paying client with a deadline. (I call it Chief Creative Officer because that sounds way more fun than CEO Week.)
It doesn’t mean clearing your whole calendar. An hour a day of real, focused attention adds up.
The key is picking a project that fits the time you actually have. “Finish my entire website” probably isn’t it. But “write my two services pages” could be. So could “gather all my website content” or “build and test my new offer page.”
Then put your actual tasks on your calendar. For that services-page example, a CCO Week might look like: Monday, confirm the offer details; Tuesday, draft the copy; Wednesday, gather photos and a testimonial; Thursday, update the page and connect the form; Friday, test, make fixes, and publish. If you have less time—or you’re waiting on someone else—spread the work out and adjust the finish line. The point isn’t to squeeze a whole site into five days.
If you’re booking a Studio Day or another professional, work backward from that date. Agree on the priority pages and what fits, share approved content and secure access beforehand, and reserve time to review the work together. Keep the rest on your next-phase list rather than treating the day like a magic reset button.
Pick the outcome. Block the time. Keep a done list so you can see what actually moved forward.
You can read more about how to make time to work on your brand or grab my free CCO Week framework here.
Before you start updating your website
You don’t need a giant project management system. Put your plan in one place—a note, a document, or a simple spreadsheet is plenty:
- Goal: What does this version of the site need to do?
- This phase: Which pages and specific updates are in? What’s waiting until later?
- People and budget: Who owns each piece, and where do you need help?
- Prep: Which copy, photos, brand assets, links, and access still need to be gathered?
- Order and dates: What happens first, what depends on it, and when will you work on each task?
- Done means: What needs to be reviewed, tested, published, and shared before you can cross this phase off?
Those decisions aren’t as exciting as picking fonts. But they give the design somewhere to go.
You can’t cross “update website” off your list until you’ve decided what “updated” means.
Give this version a finish line: what needs to change, who’s doing it, and when it will happen. The rest can belong to a later phase.
Ready to turn your website update plan into smaller, doable steps? Grab my Ultimate Website Build Checklist. Use the website planning checklist to work through the foundations, prep, content, design, and final checks—plus what to revisit after you publish.
And if you’re still not sure what needs to change—or which part to tackle first—a Studio Session gives us space to figure that out together. I’ll look at your site with you, help you figure out what’s working and what’s confusing, and we’ll map out which updates to tackle first. Want hands-on help carrying out the plan? Add a Studio Day and we’ll work through the updates together. And if you’d rather hand the whole build off, here’s how I approach website design services.
For example, when I reviewed Savannah’s website, her individual offer pages were already doing a good job explaining her services. The bigger opportunity was helping visitors find those pages and understand how her different offerings fit together. I recommended clearer navigation and a new homepage section to connect the dots—without throwing out the parts that were already working.
So here’s my question: what is it that made you realize your website needs some attention—and what’s one decision you can make about it today?
November 13, 2026


behind the brand
Behind The Brand is a weekly newsletter for solopreneurs and small business owners navigating the ongoing reality that their brand needs to evolve—whether they’re working with a DIY setup, in the middle of a rebrand, or maintaining an established brand through business pivots.
whether you're working with a DIY setup, in the middle of a rebrand, or managing an established brand through business pivots. If you love learning about the why behind brand design and want practical, actionable strategies to help you own your personal brand and feel confident marketing it—because you understand not just the what, but the how and why—then this is for you.


The Cedar June Brand Color Kit
PDF guide, canva template & tutorial
your brand.
2d Design Masterclass
learn the design basics that will help you make the most of your brand id & save time in canva
your brand.


Chief Creative Officer Week FREE framework
get more done for your brand in 5 days than you have in the last 5 months
Whether you're launching, rebranding, pivoting, or just ready to finally love your brand—here's how we can create something that celebrates who you really are while strategically growing your business.

Not sure where to start?
Book a disco call (that’s discovery call, but more fun) and we’ll figure out what makes sense for where you are right now.


Studio Sessions: WEEK LONG REBRAND STRATEGY SPRINTS
Perfect when you need strategic guidance on what's next. Sometimes you just need to brain-dump your brand overwhelm with someone who gets it. In 60 minutes, we'll tackle whatever brand challenge is top of mind—from website strategy to visual direction to figuring out your next pivot. You'll walk away with a clear strategy and the confidence to move forward.

Brand Brushstrokes: Custom Brand Identity + Illustrations

For when you’re ready to show up as your whole, multifaceted self. Stop second-guessing every design decision and get a comprehensive brand package that marries your personal and professional sides. Through custom illustrations and strategic brand development, we’ll create a one-of-a-kind, instantly recognizable brand and the guidelines you need to actually use it.


The Signature Site: Custom Website Design Through Visual Storytelling
When your business has outgrown your website. This done-for-you website design takes you from strategy through site launch. Together we build a website that screams you—where the visual story works with your copy and content, creating a site so aligned it’s like you put your signature on it.
Brand & web design services
BRAND COLOR KIT
BRAND & DESIGN BASICS
BRAND IDENTITY
ILLUSTRATIONS & ICONS
BRAND PIVOT STRATEGY
WEBSITE & SALES PAGE DESIGN

